Step by Step Guide to Measuring Buildings for Scaffolding
Introduction
Before a single standard, ledger, or board goes up, you should know exactly what you’re dealing with. Accurate measurements are the foundation for: Safe scaffold design, Correct material quantities, Reliable hire or purchase costs, Fewer changes and disputes later.
If you skip the measuring stage or “eyeball it,” your scaffold might not fit the building, might not reach the right height, or might end up needing last-minute modifications that cost money and time.
Safety and Legal Responsibilities When Planning Scaffolds
Beyond money, there’s safety and compliance. National regulators like OSHA, the HSE, and Safe Work Australia stress that scaffolds must be correctly designed, erected, and inspected to prevent collapse and falls. Accurate measurements help designers:
- Check height-to-base ratios
- Plan enough width for safe working platforms (often at least 600 mm)
- Position ties, bracing, and foundations correctly
So measuring isn’t just a commercial task. It’s part of your duty of care. Many construction projects rely on professional scaffolding rental Coimbatore services to ensure safety, compliance, and effcient setup.
Step 1: Walk the Site and Assess the Work Area
Checking Ground Conditions, Access, and Obstructions
As you walk the perimeter, note:
- Ground type: concrete, asphalt, grass, soft soil, slopes
- Level changes: steps, retaining walls, basements
- Obstructions: trees, parked cars, low roofs, awnings, power lines
- Access routes for scaffold lorries, cranes, and workers
Soft or sloping ground might require larger base plates, sole boards, or even engineered foundations. Obstacles may force you to step the scaffold in or out, so mark them carefully on your sketch.
Step 2: Measure Building Height for Scaffolding Design
Height drives the number of lifts and overall scaffold volume.
Measuring to Parapets, Eaves, and Roof Levels
From ground level, measure:
- Finished ground level to the underside of each eaves or parapet
- If work is at roof level, measure to ridge or highest working point
You can use:
- A tape and helper for low buildings
- A laser distance meter for higher façades or when access is limited
Remember, the scaffold must reach above the highest work area to allow for guardrails and toe boards.
Step 3: Measure Building Length, Width, and Perimeter
Measuring Straight Walls, Corners, and Returns
For each elevation:
- Start at a corner and measure along the wall to the next corner
- Note any changes in line: bay windows, projections, recesses
- Add each segment length to get the total for that elevation
Repeat for all sides where scaffold is needed. Your scaffolding perimeter is the sum of these lengths.
Step 4: Decide on Scaffold Bay Size and Lift Heights
Understanding Bays, Standards, Ledgers, and Lifts
A basic tube-and-fitting facade scaffold is made of:
- Standards: vertical tubes
- Ledgers: horizontal tubes along the building
- Transoms: tubes that support boards
- Bays: repeated “cells” between two standards and two ledgers
- Lifts: vertical levels where platforms can be built
You’re essentially wrapping the building with a 3D grid.
Typical Bay Lengths and Lift Spacing Used On Site
Common bay lengths along a façade are around 2.0–2.5 m, sometimes up to 3.0 m depending on design and load class.
Typical lift heights are about 2.0 m, with the first lift sometimes up to 2.5 m to allow ground access.
When deciding bay length and lift height, consider:
- Type of work (light painting vs heavy masonry)
- Required load class and platform width
- Availability of standard ledger lengths in your system
Note your chosen bay length (e.g., 2.5 m) and typical lift height (e.g., 2.0 m). You’ll use these in the next step.
Step 5: Calculate Number of Bays, Lifts, and Scaffold Area
Formula for Bays Along Each Elevation
For each elevation:
- Take the measured length (e.g., 18 m)
- Divide by the chosen bay length (e.g., 2.5 m)
- Round up to the next whole number
Example:
- Length = 18 m
- Bay length = 2.5 m
- 18 ÷ 2.5 = 7.2 → round up to 8 bays
You may slightly exceed the exact length, but that fine scaffold can overhang a little or be stepped at corners.
Calculating Lifts
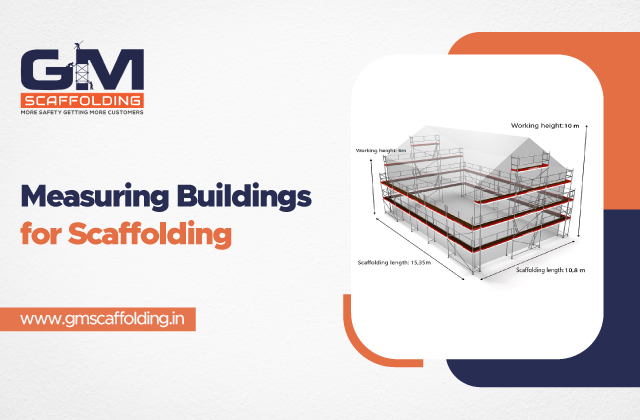
- Scaffold height 10 m
- Lift height 2.0 m
- 10 ÷ 2.0 = 5 lifts
So that elevation has 8 bays × 5 lifts.
Calculating Scaffolding Area from Height and Perimeter
A simple way many companies estimate scaffold area is:
Scaffolding area ≈ Scaffold height × Building perimeter
For more detail, you can:
- Calculate area for each elevation separately (height × length)
- Add extra areas for returns, towers, and loading bays
This area helps when:
- Requesting hire or supply quotes
- Comparing prices between firms
- Planning total labour and programme durations
Keep in mind that special structures (bridges, birdcages, suspended scaffolds) may use different measurement rules, but the basic height–perimeter approach works for most straight facades.
Step 6: Measure and Allow for Access Towers, Staircases, and Loading Bays
Pure façade scaffold is rarely enough; people and materials must move safely.
Positioning Access Points Safely and Efficiently
Decide where workers will get onto the scaffold:
- External stair towers at building corners
- Internal ladder bays in less busy areas
- Dedicated access for public interfaces if required
Measure:
- Ground space available for the stair or tower
- Clear headroom and distance from doors, windows, and walkways
These access towers often have standard modular dimensions, so your supplier can guide you—but you still need to mark positions and check there’s room.
Step 7: Record Your Measurements Clearly and Check Them Twice
Even good measurements are useless if they’re recorded badly.
Using Measurement Sheets, Sketches, and Photos
Create a simple scaffold measurement sheet, for example:
| Elevation | Length (m) | Height (m) | Bay Length (m) | No. of Bays | No. of Lifts |
| Front | 18 | 10 | 2.5 | 8 | 5 |
| Rear | 18 | 10 | 2.5 | 8 | 5 |
| Left Gable | 10 | 10 | 2.5 | 4 | 5 |
| Right Gable | 10 | 10 | 2.5 | 4 | 5 |
Conclusion
Using this guide, you can turn a walk around any building into a clear, accurate set of numbers for safe scaffold planning. When you:
- Assess the site and ground conditions
- Measure heights and perimeters carefully
- Choose sensible bay lengths and lift heights
- Calculate bays, lifts, and overall area
- Allow for access towers, loading bays, and complex features
- Record everything in a structured, checked format
Use this guide as your standard process on every project. After a few jobs, measuring for scaffolding will feel simple, systematic, and reliable.
FAQ: Measuring Buildings for Scaffolding
1.Do I really need drawings if I’m measuring on site anyway?
They’re not mandatory, but very useful. Drawings show storey heights, grids, and hidden areas like courtyards. Combining drawings with real-world measurements gives the most accurate picture and helps spot errors early.
2.How accurate do my measurements need to be?
Aim to be within a few centimetres for height and length. Scaffold systems have some flexibility, but large errors can lead to missing lifts, awkward gaps, or wasted materials. Always round up, not down, when converting to bays and lifts.
3.What’s the easiest way to calculate scaffold area?
Approximate:
Scaffold area ≈ scaffold height × building perimeter
Then add extra areas for towers and loading bays if required. This is usually enough for initial quotes and comparisons.
4.Can I measure high buildings without going on the roof?
Yes. A good laser distance meter lets you measure from the ground to parapets or roof edges. Many models are designed specifically for facade and scaffolding work and can even export data digitally for drawings.
5.What’s the most common measuring mistake people make?
Two big ones: forgetting to allow extra height for guardrails and under-measuring the perimeter by ignoring small returns, chimney stacks, or set-back sections. Both lead to under-estimates of scaffold quantity and cost.